
Spring OAuth 简单实践
引言
最近在了解OAuth2.0,一直想搞一个自己的类似于SakuraFrp使用的OpenID授权站,就想自己写一个。找的很多国内教程用的包都是 spring-cloud 下的关于 oauth 的包,或是直接使用老版本的 security-oauth 包,由于 spring-security 最新版是 6.x ,教程的版本太老,且想使用 start.spring.io 中提供的 spring-boot-starter-oauth2-xxx 使用配置文件快速开发,写下本文记录。
环境:Jdk17, Spring 3.1.4
实现
简单使用
使用 Client Credentials Grant 客户端模式对 Authorization-Server 进行简单使用
项目创建
-
新建一个空项目
oauth-demo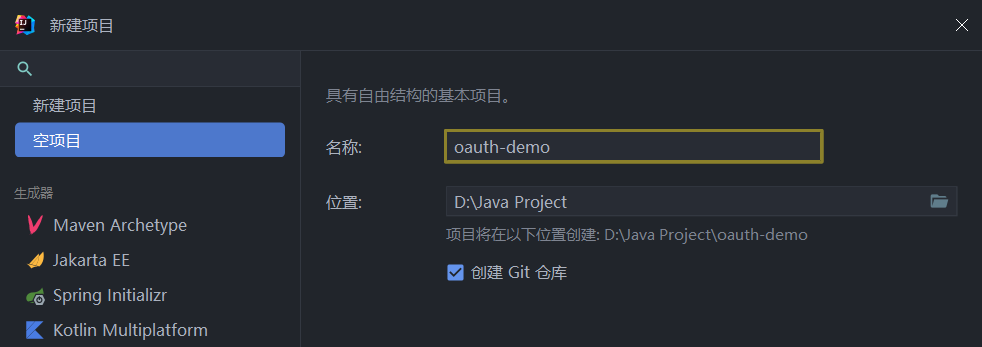
-
新建一个
authorization-server模块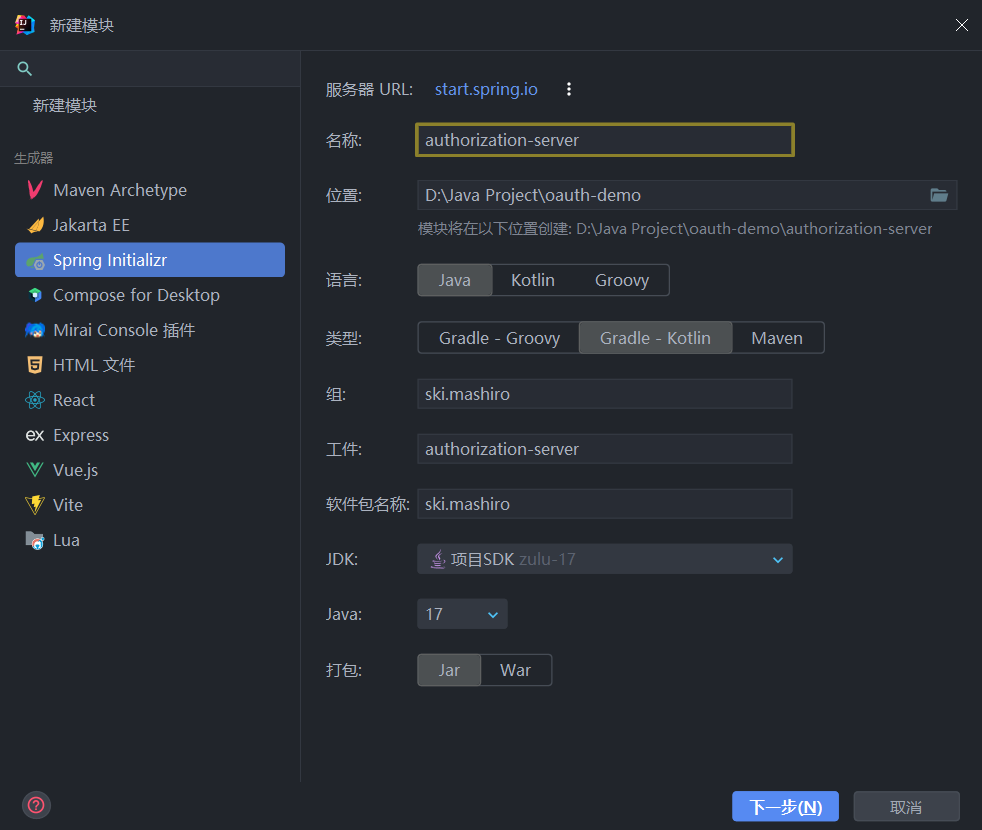
添加如下依赖:

implementation("org.springframework.boot:spring-boot-starter-oauth2-authorization-server") implementation("org.springframework.boot:spring-boot-starter-web") -
修改配置文件
server:
  port: 8080
spring:
  application:
    name: authorization-server
  security:
    oauth2:
      authorization-server:
        client:
          demo-0:
            registration:
              client-id: demo-0
              # {noop} 不加密,明文
              client-secret: "{noop}passwd"
              client-name: demo-0
              client-authentication-methods:
                - client_secret_basic
              # 客户端授权模式
              authorization-grant-types:
                # 客户端模式
                - client_credentials
logging:
  level:
    org.springframework.security: trace
启动项目
测试
使用
Insomnia或Postman进行测试向
http://127.0.0.1:8080/oauth2/token发送POST请求-
Basic Auth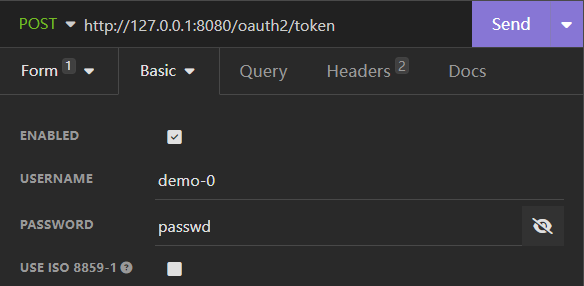
-
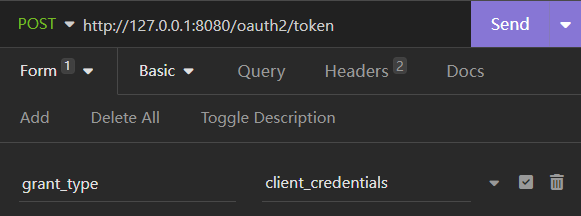
设置请求体

-
发送请求
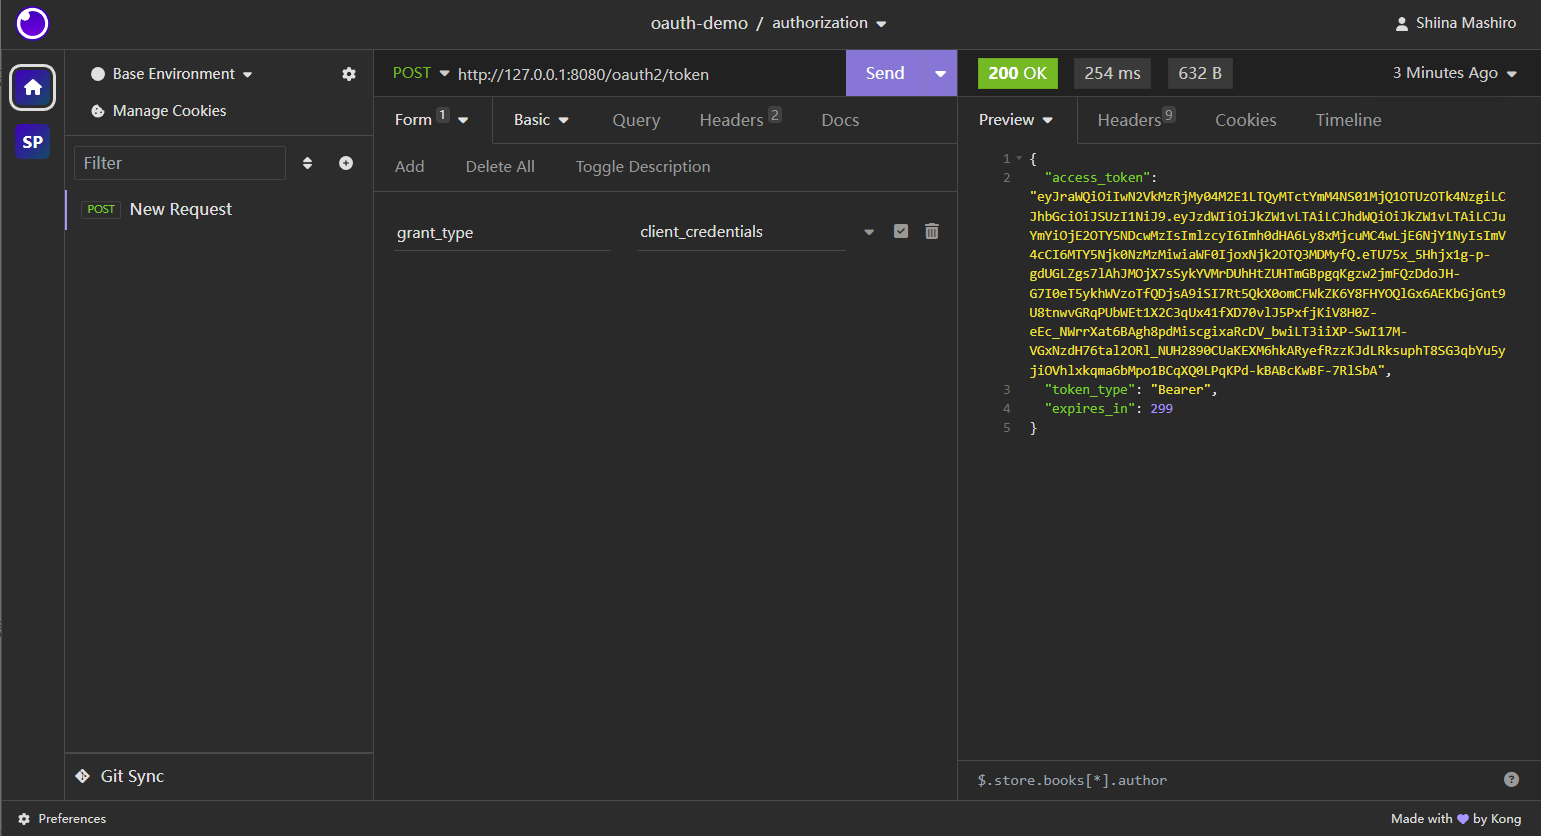
可以看到返回了
access_token和过期时间,客户端模式的具体介绍请看参考2
-
授权码模式
使用 authorization-server 同时作为 授权服务和资源服务
使用 client-1 作为客户端
authorization-server
配置文件:
server:
  port: 8080
spring:
  application:
    name: authorization-server
  security:
    # 提供的user,仅供测试使用
    user:
      name: user
      password: "{noop}password"
      roles: USER
    oauth2:
      authorization-server:
        client:
          # 客户端标识
          client-1:
            registration:
              client-id: client-1
              client-secret: "{noop}password2"
              # 授权方式:授权码,或使用refresh_token拿新的access_token
              authorization-grant-types:
                - "authorization_code"
                - "refresh_token"
              # 客户端验证方式
              client-authentication-methods:
                - client_secret_basic
              # 在同意授权后重定向的uri
              redirect-uris:
                - http://127.0.0.1:8081/login/oauth2/code/client-1
              post-logout-redirect-uris:
                - http://127.0.0.1:8081/logout
              # 提供的权限
              scopes:
                - "openid"
                - "profile"
                - "read"
                - "write"
            require-authorization-consent: true
            token:
              access-token-time-to-live: 3600s
              refresh-token-time-to-live: 7200s
logging:
  level:
    org.springframework.security: trace
client-1
项目创建
-
依赖
implementation("org.springframework.boot:spring-boot-starter-oauth2-client") implementation("org.springframework.boot:spring-boot-starter-web") -
Config
@Configuration public class SecurityConfig { @Bean SecurityFilterChain securityFilterChain(HttpSecurity http) throws Exception { return http .authorizeHttpRequests(o -> o .requestMatchers("/").permitAll() .anyRequest().authenticated()) // 用于解决非https下 oauth Not injecting HSTS header since it did not match request to ... 问题 .headers(httpSecurityHeadersConfigurer -> httpSecurityHeadersConfigurer .httpStrictTransportSecurity(hstsConfig -> hstsConfig .maxAgeInSeconds(0) .includeSubDomains(true) ) ) .oauth2Login(Customizer.withDefaults()) .formLogin(Customizer.withDefaults()) .build(); } } -
Controller
提供两个接口,一个用于测试是否启动成功,一个用于跳转OpenID登录
@RestController @RequestMapping("/") public class AppController { private final AppService appService; public AppController(AppService appService) { this.appService = appService; } @GetMapping public String getPublicData() { return "Public data"; } @GetMapping("/private-data") public String getPrivateData() { return appService.getJwtToken(); } } -
Service
getJwtToken()需要权限profile@Service public class AppService { private final OAuth2AuthorizedClientService authorizedClientService; public AppService(OAuth2AuthorizedClientService authorizedClientService) { this.authorizedClientService = authorizedClientService; } @PreAuthorize("hasAuthority('SCOPE_profile')") public String getJwtToken() { var authentication = SecurityContextHolder.getContext().getAuthentication(); var accessToken = getAccessToken(authentication); var refreshToken = getRefreshToken(authentication); return String.format("Access Token = %s <br /><br /><br /> Refresh Token = %s", accessToken.getTokenValue(), refreshToken.getTokenValue()); } public OAuth2AccessToken getAccessToken(Authentication authentication) { var authorizedClient = this.getAuthorizedClient(authentication); return authorizedClient.getAccessToken(); } public OAuth2RefreshToken getRefreshToken(Authentication authentication) { var authorizedClient = this.getAuthorizedClient(authentication); return authorizedClient.getRefreshToken(); } private OAuth2AuthorizedClient getAuthorizedClient(Authentication authentication) { if (authentication instanceof OAuth2AuthenticationToken oauthToken) { String clientRegistrationId = oauthToken.getAuthorizedClientRegistrationId(); String principalName = oauthToken.getName(); return authorizedClientService.loadAuthorizedClient(clientRegistrationId, principalName); } return null; } } -
配置文件
server:
  port: 8081
spring:
  application:
    name: client-1
  security:
    oauth2:
      client:
        registration:
          # 客户端标识,务必与授权服务注册的一致
          client-1:
            # 已在下面的provider中配置
            provider: spring
            # 标识自己
            client-id: client-1
            client-secret: password2
            # 展示授权服务的名字
            client-name: authorization-server
            # 授权方式
            authorization-grant-type: authorization_code
            # redirect-uri 参数的内容
            redirect-uri: "{baseUrl}/login/oauth2/code/{registrationId}"
            # 请求的权限,与授权服务注册的一致
            scope:
              - openid
              - profile
              - read
              - write
            # 验证方式
            client-authentication-method: client_secret_basic
        provider:
          # 使用google,github等不需要配置,已内置
          spring:
            issuer-uri: http://localhost:8080
      resource-server:
        jwt:
          issuer-uri: http://localhost:8080
流程图

测试
-
访问 http://127.0.0.1:8081
-
访问 http://127.0.0.1:8081/private-data
跳转到 http://127.0.0.1:8081/login
选择
Login with OAuth 2.0中的authorization-server相当于访问 http://127.0.0.1:8081/oauth2/authorization/client-1,然后重定向到:
http://localhost:8080/oauth2/authorize? response_type=code &client_id=client-1 &scope=openid%20profile%20read%20write &state=Za7PN3i8F-yLcxBUO0AkLFEm-Clg-s5RjJf46pDF6hE%3D // 回调的重定向url &redirect_uri=http://127.0.0.1:8081/login/oauth2/code/client-1 &nonce=1qN2mFKbEGaJb4jGFulwFDkR72dzEkgdZLrOSlRvfbk -
登录并授权
授权后重定向到:
http://127.0.0.1:8081/login/oauth2/code/client-1?
	// 授权码
	code=CNL5dhSCyohdsRFVYkL4r9RNFhX-V-EWix8KIWd4jOYQW8gWiyihLLdAafnrswacxXaAZguuMphIbv_VLku50Q9LVehmkcpD0MbBgXlzABKhPU1X-FfkUZ8U0KqwMoxF
	&state=Za7PN3i8F-yLcxBUO0AkLFEm-Clg-s5RjJf46pDF6hE%3D
然后重定向到:http://127.0.0.1:8081/private-data?continue
- 拿取access_token和refresh_token在Service中完成
参考资料:

